Installer Maker Options Overview
Navigation Controls
Menu Options
- “Custom product icon” Field
- “Custom product install icon” Field
- “Custom product uninstall icon” Field
- “Main directory” Field
- “Installer Name” Field
- “Installer Location” Field
- Shortcut Box
- Start Menu Location Radio Buttons
- Finish Page Controls
- Start Menu Checkboxes
- Generate button
Navigation Controls
Navigation through the different pages of the DoneEx Installer Maker can be done with the use of the buttons at the bottom of the application:
The “Back” button will take you to the previous page, if there is one available.
The “Next” button will take you to the next page once you have input all of the mandatory information (it will remain greyed out until then), if there is one available.
If you are on the last page, then the “Generate” button will commence the installer generation based on the data you have put into the application.
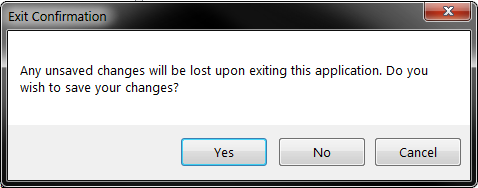
You can leave the Installer Maker at any time by either exiting the application as any other or by pressing the “Close” button in the bottom right. Upon exiting the DoneEx Installer Maker you will be promoted to save your data with the following message box:
The “Yes” button saves the information currently in the application similar to the “Save” function from the Project Menu, bringing up a “Save As” prompt if you haven’t saved before.
The “No” button exits out of the application without saving data.
The “Cancel” button cancels the exit and returns you to the DoneEx Installer Maker.
Menu Options
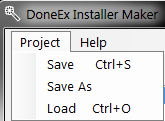
The “Project” Drop Down Menu
Under the “Project” drop down menu you can find all the buttons that relate to saving and loading the information that you have written into the DoneEx Installer Maker. This includes choices which allow you to open, save, and create new DoneEx Installer Maker project files (files with the “.dimprj” extension). These project files contain all of the information you have put into the application and store it in between work sessions.
The “Save” Menu Item
The “Save” menu item stores the information that is currently written into the application as a DoneEx Installer Maker project file (a file with the “.dimprj” extension). If you have a DoneEx Installer Maker project file already loaded or one that has been saved to previously, the data written into the Installer Maker application will be written to that file and the information stored on that file will be overwritten without prompt. If no file has been loaded and no file has been created or selected as the current save file in the currently running session of Installer Maker, then this button will behave the same as the “Save As” menu item and you will be promoted to select or create a new file to save your information as. The functionality of the “Save” menu item can be called with the Ctrl and the S key pressed together while located on any of the pages of the DoneEx Installer Maker.
The “Save As” Menu Item
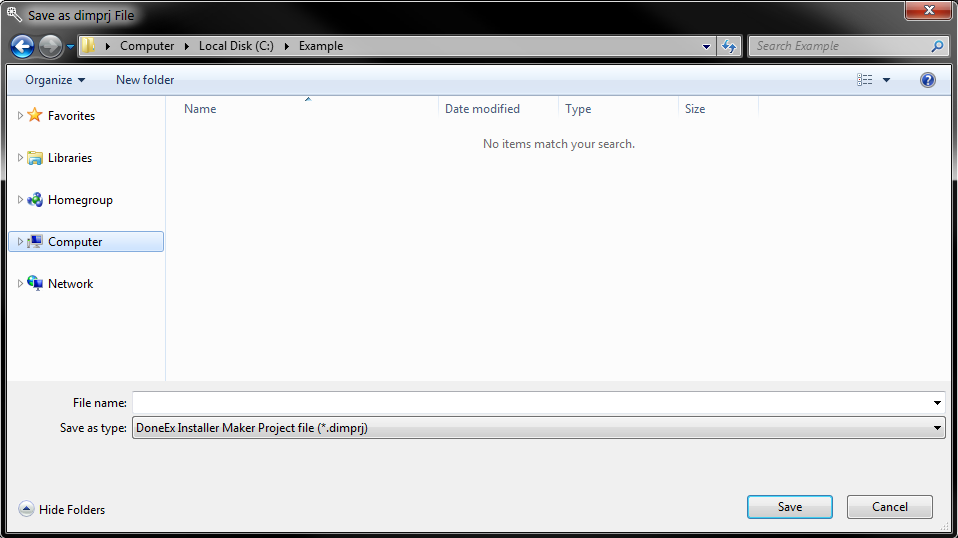
The “Save As” menu item prompts you to either select a file or create a new file to store the information that is currently written into the application as a DoneEx Installer Maker project file (a file with the “.dimprj” extension). This prompt looks as follows:
Through this prompt you can browse to a folder, type in a new file name, and create a file with that name and the DoneEx Installer Maker project file (“.dimprj”) extension by clicking on the “Save” button. You can also browse to and selected an existing file to save over it with the click of the “Save” button.
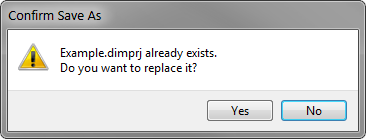
If you select a file that already exists, you will be asked if you are sure if you want to replace it, in a message box like this:
Where answering “Yes” replaces the selected file and answering “No” returns you to the Save as prompt.
The functionality of the “Save As” menu item is the same as that of the “Save” menu item when no file has been loaded, created, or saved over in the current session of Installer Maker.
The “Load” Menu Item
The “Load” menu item prompts you to select a DoneEx Installer Maker project file (a file with the “.dimprj” extension) file to load information from. The loading prompt will look as follows:
While It looks similar to the “Save As” prompt, the way it functions is different as it has an “Open” button that loads a file that you have browsed to and selected.
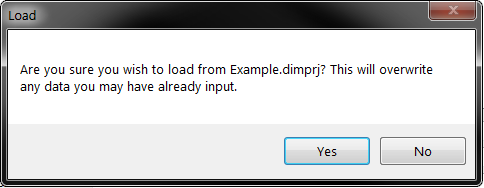
This will lead to a prompt that asks if you are sure that you want to overwrite the information that is currently on the sheet in a message box that looks as follows:
Where the “Yes” button continues the load and overwrites your data (if there is any to overwrite) and the “No” button cancels the loading process. The functionality of the “Load” menu item can be called with a combined press of the Ctrl and the O key (the letter) while situated on any of the pages of the DoneEx Installer Maker.
The “Help” Drop Down Menu
The “Help” drop down menu contains menu items that assist you with the product. This means that the Help menu contains the “About” menu item.
The “About” Menu Item
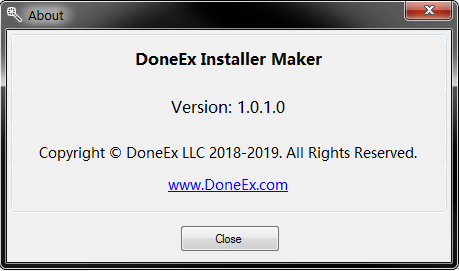
The “About” menu item contains information pertaining to your currently running DoneEx Installer Maker. When the “About” menu item is clicked on, the following message appears on your screen:
This message box displays the following information: the name of the software, your current Version in front of the “Version:” text, the copyright information for the application, and a link to the company website, where you can get additional information about DoneEx Installer Maker as well as information on other DoneEx products.
Page 1
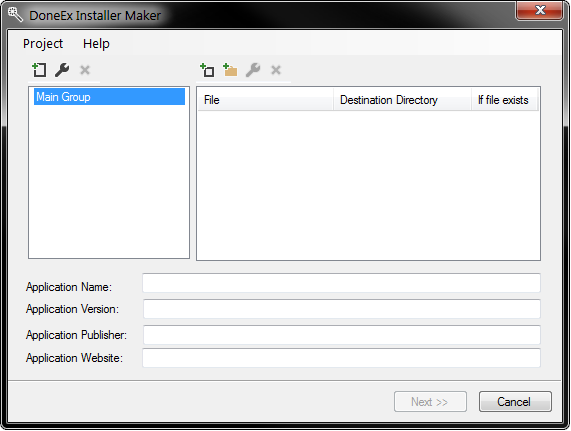
The first page of the DoneEx Installer Maker contains a group box and its controls on the left, the file box and its controls to the right, and four text fields identified as “Application Name”, “Application Version”, “Application Publisher”, and “Application Website”.
Group Box
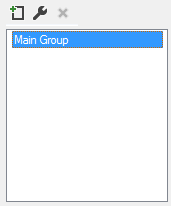
The container on the left side of the first page of DoneEx Installer Maker is the group box, which also has 3 buttons above it. These buttons relate to the creation, editing, and deletion of groups in the group box. Items inside the group can be dragged around and dropped in different locations relative to each other. Use this feature to organize your groups to your liking!
New Group Button
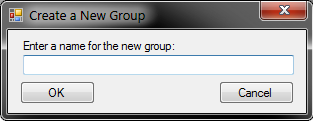
The “New Group” button allows you to create a new group with the following dialog:
Just type in a name for your new group in the text field and press the “OK” button and your new group will be added to the group box.
Edit Group Button
![]()
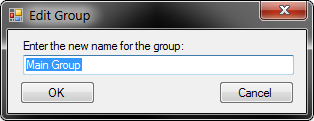
The press of the edit button above the group box allows you to edit the name of an existing and currently selected group with the following dialog:
type in the new name that you want for this group in the text field and press the “OK” button and then your group will be changed to that name.
This dialog can also be called with a double click on the group you wish to edit the name of.
Delete Group Button
![]()
With the click of the delete button above the group box you can delete the groups you wish to no longer use. Note that you cannot delete the last group in this dialog as you must have at least one group in order to be able to add files. Also, all of the files inside the group you delete are removed from the Installer Maker interface (and since Installer Maker never modifies the actual files, the files on your computer are not touched).
File Box
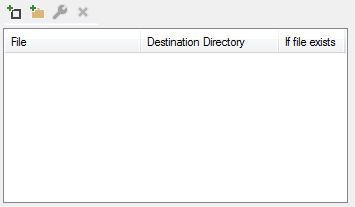
The container on the right side of the first page of DoneEx Installer Maker is the file box, which is labeled with 3 fields—“File”, which is the full file path, name and extension, “Destination Directory”, which is the destination of the file on installation, and “If file exists”, which is how the installer treats the file if the file already exists in the destination directory listed for the file. The file box also has 4 buttons above it. These buttons relate to the creation, editing, and deletion of files in the file box. Items inside this box can be dragged around and dropped in different locations relative to each other. Use this feature to organize your files in each group to your liking!
New File Button
![]()
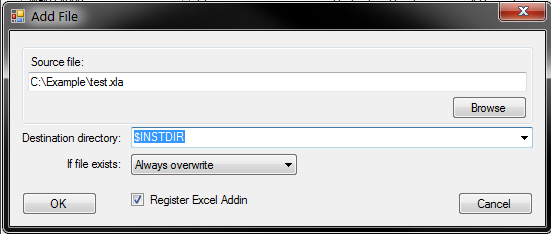
The first button above the file box is the new file button, which allows you to add a new file to the currently selected group in the group box. This is done through the following dialog:
New File Dialog
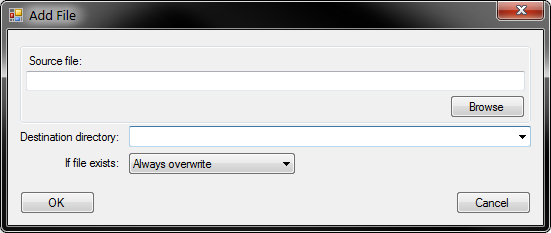
In this dialog you can either type in or paste the full file path, name and extension of the file you wish to add into the “Source file:” textbox or you can browse to that file using the Browse button. The Browse button brings up a browse dialog that allows you to browse to a file and select its location by pressing the “Open” button in that dialog.
The Destination directory is the field that determines the destination of the file on installation. We recommend that you use the drop-down menu and select one of the options in this field. Advanced users can choose to edit this field for a more custom location on installation, however, in this scenario, the placement of the file on installation becomes less than guaranteed and errors may arise during installation. The variables and their locations are as follows (the “Users” folder is the same thing as the “Documents and Settings” folder on systems prior to Vista):
$APPDATA— directs to the current user’s application data folder, also known as the “AppData” directory, usually located as “C:\Users\YOURUSERNAMEHERE\AppData\Roaming”
$DOCUMENTS—leads to the public user’s documents directory, usually found as “C:\Users\Public\Documents”
${MYDOCUMENTS}—leads to the current user’s documents directory, usually found as “C:\Users\YOURUSERNAMEHERE\Documents”
$FAVORITES—routes to the current user’s “Favorites” folder, usually found as “C:\Users\YOURUSERNAMEHERE\Favorites”
$MUSIC— leads to the current user’s “Music” folder, usually located as “C:\Users\YOURUSERNAMEHERE\Music”
$PICTURES—directs to the current user’s “Pictures” folder, usually located as “C:\Users\YOURUSERNAMEHERE\Pictures”.
$PROFILE—routes to the current user’s profile folder, usually found as “C:\Users\YOURUSERNAMEHERE\”
$PROGRAMFILES—leads to the current computer’s “Program Files” folder, usually found as “C:\Program Files” folder. This leads to the “Program Files (x86)” folder on 64-bit Windows Operating Systems.
$RESOURCES—routes to the resources folder, which stores themes and other Windows resources. This folder can be found under the following path: “C:\Windows\Resources”. This folder can also be directed to as “$WINDIR\Resources”.
$RESOURCES_LOCALIZED—routes to the localized resources folder, which can also store themes and other Windows resources. This folder can be found under the following path: “C:\Windows\Resources\1033”, with the four digits not being consistent between computers.
$SYSDIR—leads to the current computer’s system directory, also known as the “system32” folder, usually located as “C:\Windows\System32”
$TEMPLATES—directs to the current user’s “Templates” folder, usually found as “C:\Users\YOURUSERNAMEHERE\AppData\Roaming\Microsoft\Windows\Templates”
$VIDEOS—leads to the “Videos” directory, usually located as “C:\Users\YOURUSERNAMEHERE\Videos”
$WINDIR—key word for the Windows directory, usually found as “C:\Windows”
${PRODUCT_NAME}—refers to the text written in the “Product Name” field on the first page of Installer Maker.
${PRODUCT_PUBLISHER}—refers to the text written in the “Product Publisher” field on the first page of Installer Maker.
The “If file exists” combo box determines how the installer treats the file if that file already exists in the destination directory listed. The choices available for this combo box are as follows:
“Always overwrite” – which makes it so that the installer will always overwrite the file in found in the destination directory location with the file contained in the installer.
“Never overwrite” – which makes it so that the installer will never overwrite the file in the destination directory location with the file contained in the installer.
“Overwrite if newer”— This choice makes it so that the installer will overwrite the file in the destination directory location with the file contained in the installer only if the file contained in the installer is newer. This also means that if the file found in the destination directory is older than the file contained in the installer it will be overwritten as well.
“Try to overwrite”— This choice makes it so that the installer will overwrite the file in the destination directory location with the file contained in the installer if it is possible. If overwriting the file found in the destination directory location with the file contained in the installer proves to be impossible then the file is skipped over and untouched.
“Overwrite if different”— This choice makes it so that the installer will overwrite the file in the destination directory location with the file contained in the installer if the files have different dates. This means that if the file found in the destination directory location is either older or newer than the file contained in the installer then it will be overwritten.
Once you have finished filling in the fields on this dialog, you can add the file by clicking the “OK” button. If any messages come up, correct your input to the message’s specification. If there was no message, then your file should have successfully been added to the currently selected group. You can also click on the “Cancel” button to leave the “Add file” dialog and return to the main Installer Maker form.
Add Directory Button
![]()
The second button above the file box is the “Add Directory” button and it allows you to add a directory of files and subfolders to the currently selected group in the group box. This is done through the following dialog:
Add Directory Dialog
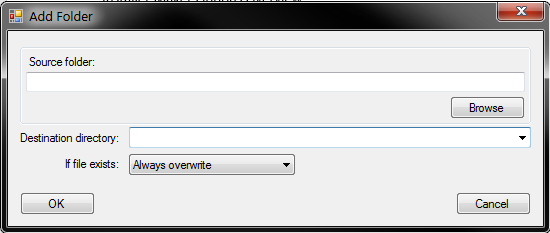
This dialog’s fields and features are the same as that of the “Add File” dialog.
Edit File Button
![]()
The third button above the file box is the “Edit File” button and it brings up the “Edit File” dialog, which allows you to edit the currently selected file in the currently selected group in the group box. This button is grayed out and unavailable while there is no file selected. dialog can also be raised by double clicking on a file you wish to edit. When the Edit File” dialog is called, it looks something like this:
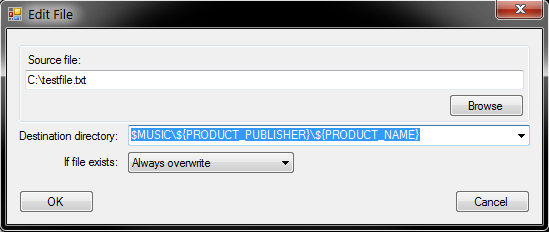
The “Edit File” dialog’s fields and features are the mainly same as that of the “Add File” dialog. The main difference being that when the “Edit File” dialog is summoned, the current selected file’s information is already listed in the dialog’s fields. The enables for easy viewing as well as easy editing of the file’s information.
Register Excel Addin Checkbox
The “Register Excel Addin” checkbox appears if you have an excel add-in file (a file with a .xla or a .xlam extension) selected in either the “Add File”, “Add Directory”, or “Edit File” window. Checking on this checkbox makes the generated installer automatically register the Excel Add-in during the registration process (this also means the add-in will be deregistered when the during uninstallation)
Delete File Button
![]()
The fourth button above the file box is the “Delete File” button and it deletes the currently selected file in the currently selected group in the group box. If no file is selected then this button is grayed out, since you cannot delete a file when you do not have one selected.
The “Application Name” text field is the display name of your application. This is generally used in conjunction with the “Application Version” field when displaying the name of your application in the installer and in the uninstaller. The text in the “Application Name” text field can also be used as a folder or subfolder in Start Menu shortcuts or destination directories depending on your input involving those choices, such as in the shortcut or the file dialogs.
The “Application Version” text field is the display version of your application. This is generally used in conjunction with the “Application Name” field when displaying the full name of your application in the installer and in the uninstaller.
The “Application Publisher” text field is the display name of the company related to your application. This is generally used when displaying the name of the company related to your application in the installer and in the uninstaller. The text in the “Application Publisher” text field can also be used as a folder or subfolder in Start Menu shortcuts or destination directories depending on your input involving those choices, such as in the shortcut or the file dialogs.
The “Application Website” is an optional text field that, if filled in, will place a link to the website in the start menu (if the option is checked on at the last page of Installer Maker) and in the Main Directory.
Page 2
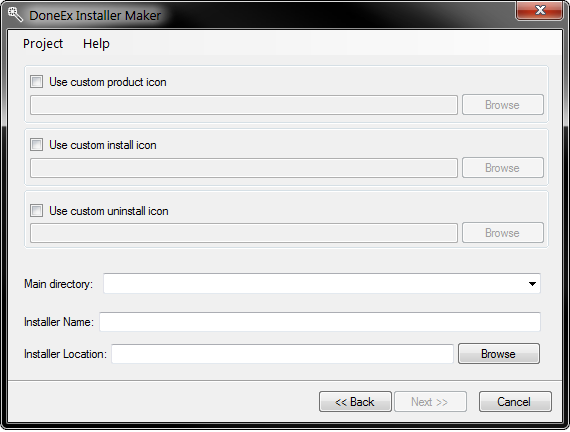
The second page of the DoneEx Installer Maker contains fields that control the icons related to your product, as well as the Main directory, Installer Name and Installer Location.
Checking on the “Use custom product icon”, the “Use custom install icon”, and/or the “Use custom uninstall icon” checkbox enables the respective text field and browse button for that checkbox. Also, upon being checked on, the appropriate text field becomes mandatory and the Installer Maker will not progress until it is properly filled out.
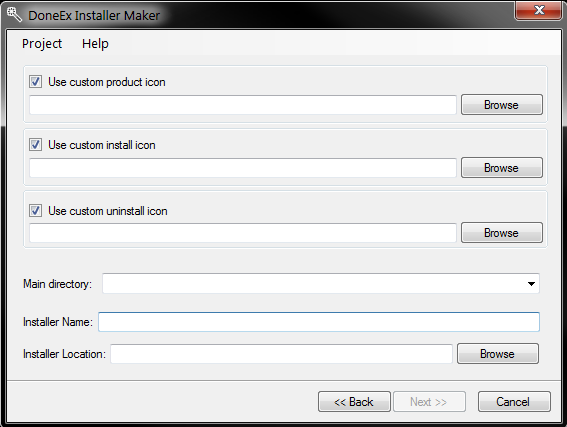
The “Custom product icon” field pertains to the icon that represents your product in windows applications, such as the product’s icon in the “Add or Remove Programs” control panel. If this option is left unchecked the default executable icon is used for your product in these cases.
The “Custom product install icon” field contains the that is used in the installer for your product. If this option is left unchecked the default install icon is used for your product’s installer.
The “Custom product uninstall icon” field represents the icon that is used in the uninstaller for your product. If this option is left unchecked the default uninstall icon is used for your product’s uninstaller.
The “Main directory” field determines the location of some of the core files related to your product’s installation, this includes icons added through the Installer Maker through the fields shown above, the uninstaller, as well as the website if one was given on the first page and the custom license text if one was provided in the related Installer Maker interface on the third page. While you can manually write in and edit this field, we recommend that you just use the drop-down menu to select your “Main directory” of choice if you are not an advanced user.
The “Installer Name” field determines the name of the installation file. Once generated, your installer will be placed in the “Installer Location” with the name of the input in this field along with a “.exe” extension. This field is needed in order to generate an installer file, meaning that the Installer Maker will not progress until this field is filled out.
The “Installer Location” field determines the location of your installation file upon generation. You can write or paste a location into this field, but we recommend that you use the browse button to locate and set the folder you wish to place your installer into. This field is mandatory for the generation of a proper installer, meaning that the Installer Maker will not progress until this field is properly filled out.
Page 3
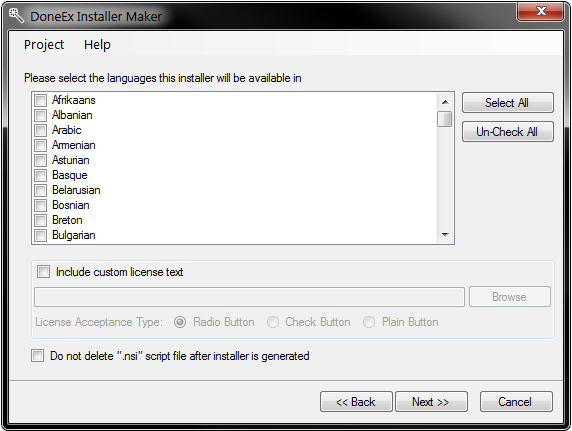
The third page of the DoneEx Installer Maker contains fields that control the languages that your product installer will be provided in, as well as custom license text controls and a “.nsi” script file control.
Language Selection
The language selection control allows you to select what language or languages your installer and uninstaller will be available in. There are two buttons that can assist you with language selection: the “Select All” button, which selects all of the languages in the list, and the “Un-Check All” button, which deselects all of the languages on the list. It should be noted that Installer Maker will not progress to the next page until there is at least one language selected.
Custom License Control
The custom license checkbox enables the rest of the custom license controls, which include the custom license text field and its corresponding “Browse Button”, and the license type radio buttons. If the custom license checkbox is checked on, Installer Maker will not progress to the next page until there is a path to a text file in the custom license text field. The custom license text field can be filled in, pasted into, and edited by hand, or be filled through the use of the “Browse” button to the right of the text field. The “Browse” button to the right of the text field brings up a dialog that can browse to the text file you wish to use as your custom license and is the recommended way of selecting your custom license.
The “License Acceptance Type” radio buttons control the style of input your license will be accepted in in the following ways:
“Radio Button”— This option has the user select between an “I accept” choice and “I do not accept” choice for the license, with the default radio button that is selected being “I do not accept”. The installer will only continue once the “accept choice” radio button is selected.
“Check Button”— This option has the user check a checkbox in order to accept the license and continue the installation. The checkbox is unchecked by default and the installer will not continue until the checkbox is checked.
“Plain Button”—This option makes the “next” button turn into an “I agree” button. By pressing this button, the user goes to the next stage of the installer.
NSI file checkbox
![]()
The “Do not delete “.nsi” script file after installer is generated” checkbox does just that, it leaves the “.nsi” file from which the installer was generated in the same directory as where the installer is located. This allows advanced users to make modifications directly to their NSIS script in order to make advanced changes to their installer. The edited script will have to be compiled manually (with a right click on the “.nsi” file and a left click on the “Compile NSIS Script” item).
Page 4
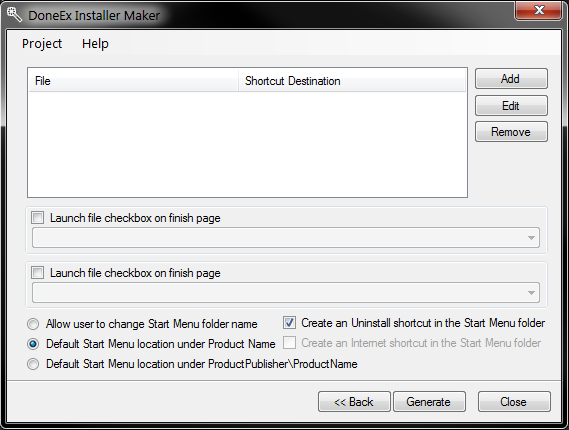
The fourth page of the DoneEx Installer Maker contains fields that control the placement of shortcuts to core files and to files the installer is installing, as well as controls for finish page actions and Start Menu shortcut folder configuration.
Shortcut Box
The shortcut box contains the current list of all of the additional shortcuts you wish to make. It is labeled with “File”, which is the installation destination of the file you wish to make a shortcut to, and “Shortcut Destination”, which is what the location of the shortcut is going to be. You can make changes to this list with the “Add”, “Edit”, and “Remove” buttons to the right of this box.
Add New Shortcut

By pressing the “Add” button located to the right of the shortcut box, the Add New Shortcut dialog appears. This dialog has two dropdown selections, the “File” dropdown control and the “Shortcut” dropdown control. The dropdown control labeled “File” determines the file and its installation location (which has been set on the first page of Installer Maker) that the shortcut will lead to. The information set by this field is displayed in the shortcut box under the label of the same name (the “File” label). The dropdown control labeled “Shortcut” determines the location of the shortcut that will be created. The information set by this field is displayed in the shortcut box under the similarly named “Shortcut Destination” label. Once you have selected the file and the location of the shortcut you wish to create for that file, you can press the “OK” button to add that shortcut to the list of shortcuts in the shortcut box. The “Cancel” button on this dialog returns you to the main DoneEx Installer Maker interface.
Edit Shortcut
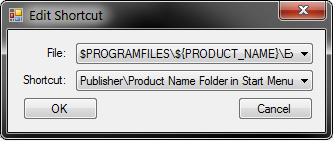
Pressing the “Edit” button to the right of the shortcut box while having a shortcut selected or double clicking on the shortcut you wish to edit brings up the “Edit Shortcut” dialog. This dialog is similar to the “Add New Shortcut” dialog, with a couple of exceptions: this dialog does not add a new shortcut into the shortcut list but edits the information in the currently selected shortcut in the list instead, and, when this dialog is called, it already contains the information from the currently selected shortcut in the list in the appropriate fields.
Remove Shortcut
The press of this button removes the currently selected shortcut in the shortcut box. If no shortcut is selected or no shortcuts are listed then this button is grayed out.
Finish Page Controls

There are two controls that affect the launch of files on the finish page of the generated installer. Each has a checkbox labeled “Launch file checkbox on finish page” and a dropdown menu selection under it.
The drop-down menus become available when their respective checkbox is checked on. Once a checkbox is checked on you can select which file, of the installed files (listed on the first page of Installer Maker), can be launched upon completion of the installation. The user still has control over whether they want to launch the file or not through a checkbox on the final page of the installation. It should also be noted that while at least one of these checkboxes are on then the Installer Maker “Generate” button will be grayed out until either a valid selection is made, or the checkbox related to the invalid input in the dropdown control is checked off.
Start Menu Location Radio Buttons

These radio buttons select between three possible locations for the Start Menu shortcuts:
The first radio button places the Start Menu shortcut location in a folder whose name is determined by the user.
The second radio button places the Start Menu shortcut location in a folder which is named after your product’s name, determined by the similarly labeled field on the first page of the Installer Maker.
The third radio button places the Start Menu shortcut location inside two folders, the first of which is named after your product publisher, the second folder—located inside the first—being named after your product’s name. Both, the product publisher and your product name, are determined by the similarly labeled fields on the first page of the Installer Maker.
Start Menu Checkboxes
![]()
The “Create an Uninstall shortcut in the Start Menu folder” checkbox ensures that the generated installer creates an Uninstall shortcut in the Start Menu folder during the installation.
The “Create an Internet shortcut in the Start Menu folder” checkbox ensures that the generated installer creates a link to your website in the Start Menu folder during the installation. This checkbox is grayed out if you have not provided a website on the first page of the DoneEx Installer Maker.
Generate button
Once you have put in all of the information pertaining to your installer, pressing the “Generate” button will create the installer. This installer will be located in the location provided in the “Installer Location” field on the second page of the Installer Maker, but upon successful creation of your installer you will be prompted to open that location automatically. If you if you reply with a click on the “Yes” button to that prompt, then a new window will open browsed to the location of your new installer.
